Subscribe via email


Click here to subscribe to the MILLAMIA blog by Email

To view previous blog posts scroll down to the bottom of the page

Friday 27 March 2015

TUTORIAL - Magic Loop

There are a couple of techniques that have revolutionised my knitting life. Regular readers will already be saying 'mattress stitch' quietly to themselves - which makes me giggle as you all know what a passionate advocate I am (to the point of obsession!) for utilising this incredible finishing technique wherever possible. But the other technique that I find myself turning to for all of my knitting in the round, is magic loop.

I was a doggedly determined DPN user for socks and sleeves for many years until I taught myself magic loop, and since mastering it I really haven't looked back. It has so many advantages in comparison to using double points.

To begin with, many knitters find loose 'ladders' appearing between needles when using double points. It's a common enough problem and one that can be resolved by keeping a good tight tension between those joins, but is an issue that virtually disappears when using magic loop. Of course magic loop reduces the amount of gaps between needles to just 2, and for me anyway, it's easier to manage the tension between the needles as they are closer together by virtue of the way you knit from one to the other.

Another advantage is that the quantity of stitches is really only limited by the length of the cable you use. As long as you have enough spare cable on either side for manoeuvrability, then you can even knit a sweater in the round using magic loop. At the other end of the spectrum, you can go right down to just a few stitches - 4! on your needles and still manage them fairly well. At this end it becomes a little tricky but it means that you can decrease right down to the very tip of a toe or the top of a hat without having to change to clunky DPN's.

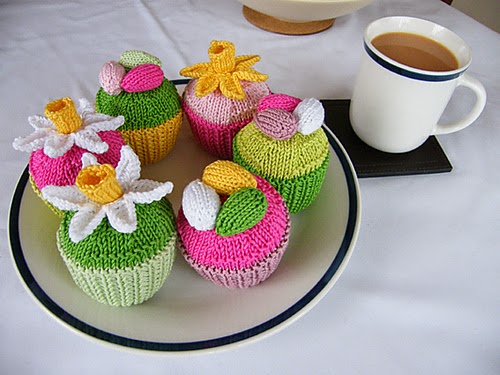
I thought it would be useful to share this technique here in the form of a picture tutorial. It's the method I used for knitting the cute Easter Egg Hats last week, and as I mentioned can be used for knitting socks, sleeves, baby clothes, mittens, toys and even adult garments in the round. Remember you can convert flat pieces to knitting in the round for something like a sleeve - you will just need to subtract the stitches allowed for seaming - usually 1 at either side.

A couple of tips for using magic loop before the tutorial:
1) Make sure your circular needle is at the least 80cms. I find this is adequate for small items, but 100cms is often more 'comfortable'. You will adjust to the length that suits you best as you become more used to magic loop.
2) Invest in a circular needle that has a nice supple cable. Some cheaper circulars have stiff, plastic cables that will hinder your progress because they are just too inflexible. The circular I am using in the tutorial is from Signature Needle Arts which was a very thoughtful gift from a friend in the US (where they are made), but I find that Addi which are available much more widely in Europe are equally good. A simple Google search will show you where you can buy them locally.
3) Don't pinch the cable too hard when you are dividing your stitches on the initial row after casting on - you don't want a kink in your cable!


1) Cast on. An even number works best for equal division of stitches.


2) Find the middle of the stitches - in this instance I cast on 32 so I found the middle after stitch number 16. Slide the stitches down so that you can pull the cable through this 'gap' between the 2 equal numbers of stitches - this is the part where you don't want to pinch that cable too hard!


3) Slide 1 set of 16 stitches up to the end of one needle and the other set of 16 stitches up onto the other so that they are lying parallel and with your working yarn coming from the stitches on the back needle.


4) It is vital here - before you begin to actually knit the first round, that you ensure your stitches are not twisted in any way. I manage this by ensuring that the edge of stitches - the nice even bottom of the stitches is facing in towards the centre and I hold them firmly between my thumb and fingers so that they don't twist as I'm knitting. Some knitters recommend that you knit the last cast on stitch with the first to try and eradicate any gap on this first round. I have found that it doesn't really make much difference and so I just start to knit without trying to avoid the gap. On the second round however, I make sure I keep the first couple of stitches quite tight and this generally removes any excess yarn between the needles on the first round. You can of course use the cast on tail to tidy it up more at the end if you need to.


5) Using the 'back' needle to knit the stitches off of the 'front' needle, continue to the end of this first needle.


6) When you have reached the end of this first needle your needle in the left hand will now be 'free'. You now need to turn your work 180 degrees so that this free needle is at the front and the needle with all the stitches you have just knitted (along with the working yarn) is at the back - effectively swapping back needle for front and front for back.


7) To begin the next needle you will need to shuffle your stitches a little. Push the front needle through from the left (and pull the cable through) so that your stitches are up onto the needle ready to be knitted. Now pull the back needle through so that the stitches you have just knitted are sitting on the cable and the needle is free ready to knit from the front set. You will always use the back needle to knit the stitches onto, and your yarn always needs to come from the back needle.


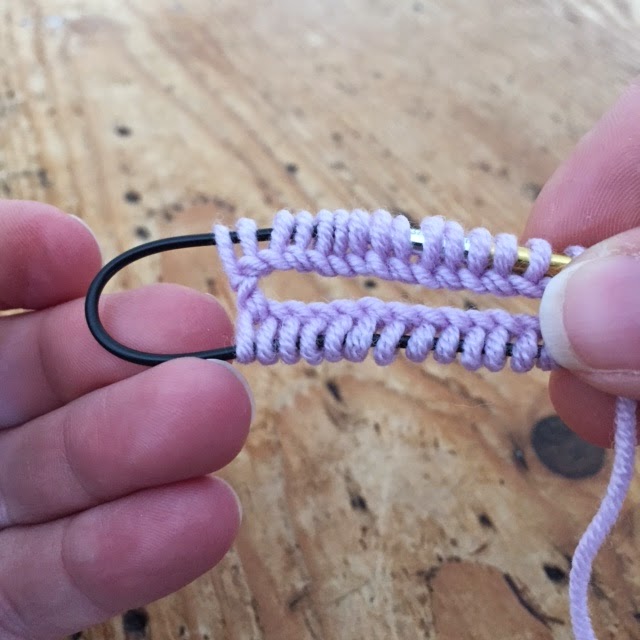
8) This picture shows progress after the very first row. You can see that there is a long strand of yarn between the needles, but as I mentioned earlier, you will be able to tighten this up in the subsequent row. As a side note, these early rows can be a little tricky to manage, but trust me - once you have knitted a few rows, it gets a whole lot easier!


9) This picture shows my knitting mid row - with the cable loops or 'bunny ears' typical of the magic loop method. There is nothing much more to the technique than that - keep on in this way, knitting the stitches off of the front needle using the back one, turning your work, pulling the cable through and starting again. If your knitting looks like this - you've conquered Magic Loop!

(posted by Max)

Friday 20 March 2015

INSPIRATION - Easter knits

http://www.ravelry.com/Ravelry is almost always a long, exciting fall down a rabbit hole for me. I meander over there with an idea for a project that I'm thinking about, and emerge clutching more than I need and a head singing with ideas many hours later!

This was definitely the case with my search for some cute, quick Easter knits. I had some scraps of Naturally Soft Merino in some delicious pastel colours that I wanted to make into something to decorate our Easter table. Of course, I found the perfect pattern . . . I just happen to have a few other too cute knits that I couldn't resist either.

The Easter Egg Hats by Knitca is a FREE pattern and top of my Easter pattern pick. This is a great scrap buster - with each hat taking only 6gms of yarn including the pompom, and around 1/2 hour to knit, they are quick and satisfying to make.

The pattern actually calls for DK weight yarn but the NSM (colours daisy yellow, lilac blossom, petal and forget-me-not) worked a treat and the hats fit really well. Knitted in the round, I used my trusty circular needle for magic loop rather than the DPN's specified just as a personal choice but either would work equally well.


My family love boiled eggs, so these little Easter egg bonnets will be a welcome - and very cute - addition to the table, although I imagine that chocoholics could equally hide a Cream Egg under a hat for a tasty Easter treat.

Our very own Erik the Easter Bunny insisted on coming in at the number 2 spot (also a FREE pattern) but if you are a crocheter then you will love this adorable bunny pattern from All About Ami. Spring Bunnies is FREE and calls for DK yarn too, but the lovely tight twist on our smooth merino makes this great for crocheting with - just make the relevant adjustment to hook size if necessary. Stephanie, the incredible talent behind All About Ami has helpfully provided step by step photos on her Blog to guide you through making these adorable bunnies find it HERE.

http://millamia.com/pat_size.php?name=Erik The Easter Bunny&sort=&type=

http://www.ravelry.com/patterns/library/spring-bunnies-2

Straight in at number 4 are the Easter Cupcakes by Louise Watling. These inedible versions may just be the perfect panacea to all the calorific Easter food - and they look almost as good as the real thing! The pattern costs £3.99 and is available from Womens Weekly pattern store (link via Ravelry).

http://www.ravelry.com/patterns/library/easter-cupcakes

And finally, Easter wouldn't be Easter without a cute chick or two. This sweet and funny take on the old saying 'Which Came First' is the latest offering from Frankie Brown. An egg inside a chick . . . no wait, a chick inside an egg . . . you get the picture! Another FREE pattern - Frankie doesn't charge for any of her patterns but just suggests you may like to support a charity she is really passionate about - link HERE. This also calls for DK weight, but as size and fit is not important for a toy, Naturally Soft Merino would work well - again just adjust your needle size accordingly. You could even match the colours in the picture for a funky chicken - daisy yellow, claret and Limited Edition pumpkin.


We're running a competition on Facebook and Instagram for the next two weeks just because we love to see what our followers are making with our Naturally Soft Merino and Aran. Remember to post your pics over on our Facebook page or on Instagram with the hashtag #millamiacompetition for a chance to win 4 balls of merino and a MillaMia paperback book of your choice.

Eggsiting isn't it!
(posted by Max)

Thursday 12 March 2015

DESIGN - Mother and Daughter Knits

Great fashion design always manages to effortlessly appeal across generations while achieving a timeless, classic status. It's what makes a Chanel suit as relevant today as it was in 1923, and why it suits women of all bodyshape and age. To take the idea a little further though - can great design span a much wider age spectrum - the polar opposites of young and old. And if it can, should it?

http://millamia.com/pat_size.php?name=Livia Adult Cardigan&sort=&type=
The Livia Cardigan for adults and kids

It's something we at MillaMia had to think rather deeply about a couple of years ago. We had produced some of our most iconic pieces - the Charlotte Cardigan, the Cecilia Coat and the Alexander Jacket for children but were increasingly being asked by our customers to upsize them. The exclamation of 'I would wear that!' from a lady customer at one of the retail shows we attend, as she lovingly gazed at a tiny cardigan for a 2 year old, was something we would hear repeated many times over.

After much debate, we decided to bow to popular opinion and selecting some of our most sought after designs, we 'grew them up' for the adult audience. The trio of adult collections was received with such enthusiasm and admiration that we knew from the outset we had made the right choice. Some of the key pieces were indeed exact, upsized replicas of the kids garments and these are still proving to be our best-selling patterns to date.
 
http://millamia.com/pat_size.php?name=Charlotte Cardigan&sort=&type= http://millamia.com/pat_size.php?name=Charlie Cardigan


http://millamia.com/pat_size.php?name=Cissi Swing Coat&sort=&type= http://millamia.com/pat_size.php?name=Catrin Jacket&sort=&type=


http://millamia.com/pat_size.php?name=Lovisa Cardigan&sort=&type= http://millamia.com/pat_size.php?name=Annika Cardigan&sort=&type=


http://millamia.com/pat_size.php?name=Lilian Jacket http://millamia.com/pat_size.php?name=Bella Jacket


We all know instinctively when a design works - whether sized for a child or an adult, man or woman. If it manages to encompass classic appeal, great fit and style as well as offering a glimmer of unique detail to set it apart then it will happily grace the halls of the great. It may be blowing the MillaMia trumpet to say that these garments have managed to achieve the heady heights of great design, and I will leave you to form your own opinions about that!

Aside from pondering their level of greatness, the one thing that is true to say is that the trend of Mother and Daughter knits has already begun to gather some momentum here in Europe. With Alana Dakos aka Never Not Knitting trailblazing matching knits for Mum and daughter in the US with such designs as her Gnarled Oak and Little Oak, and with Mothers Day fast approaching here in the UK, there has surely never been a better time to cross the generational gap and step out in matchy-matchy style. Has there?
(posted by Max)

Friday 6 March 2015

KNITTING - for premature babies

It's a well known fact that knitting for babies is one of the most satisfying ways of utilising the time and talent of any knitter. But crafting tiny, beautiful items for premature babies whether you know them or for charitable donations to hospitals, has to be the most worthwhile and rewarding reason for picking up your needles.

A friend of one of the MillaMia team has just been blessed with her son rather earlier than expected. Arriving small and early meant that he was in need of some tiny clothes pretty quickly, and who better to turn to than knitters when some speedy crafting is required?

These cute hats are a free pattern available on Ravelry - called 'Preemie Hats For Charity' by Carissa Browning. There are 5 designs taking small amounts of sportweight yarn so perfect for using up those odds and ends of  MillaMia Naturally Soft Merino. I had some putty grey, storm and teal left over from various projects suitable for a new baby boy, and decided on knitting a couple of striped and 2 ribbed hats to make it interesting for me, but also to ensure that with a choice of fit, at least 2 of them would be ok.

Each hat took around 2 hours to complete, knitted in the round using the magic loop technique. The combination of simple, gratifying knitting, over very few stitches destined for someone so worthy honestly made these little hats one of the most pleasing knitting experiences ever.


Sally, one of our incredibly talented test knitters also managed to whip up some tiny cardigans in next to no time. Knitted in Naturally Soft Merino in putty grey, forget-me-not and storm the main body took around 60g with a small amount needed to for the contrast edgings. The pattern is the Garter Stitch Cardigan by Debbie Bliss from her book Design It, Knit It: Babies.


While looking for suitable patterns to use, I came across a wealth of free patterns designed with knitting for charity in mind. There are some wonderful charities that provide free patterns, and accept all manner of knitted items for donation to hospitals across the world. Bliss and Preemies UK are just 2 organisations that work immensely hard in fundraising and providing the huge quantities of knitted items needed. Full details of knitting for or donating to these incredible charities are on their websites.

It prompted some thinking on my part. About the use of my time and talent, and about making something truly worthwhile but that will always be gratefully received. With a hat taking the gift of 2 hours and a scrap of yarn, I really have no excuse.
(posted by Max)