Subscribe via email


Click here to subscribe to the MILLAMIA blog by Email

To view previous blog posts scroll down to the bottom of the page

Friday, 23 August 2013

TUTORIAL - Mattress Stitch

You will all know by now that I'm a stickler for exemplary finishing. I invest an enormous amount of time, effort and knitting energy in my projects and I truly believe that taking that extra time to complete them with careful, professional finishing techniques transforms my knitted pieces into garments and accessories I am proud to wear.

There are 2 main things that will instantly and dramatically raise the look of a hand-knitted garment from home-made to hand-crafted and these are:

1) Blocking! Pinning the individual pieces of a garment out to the specified sizes will not only even your stitches out, improve the drape and feel of the knitted fabric, but it will also make seaming that much easier.

2) Using Mattress Stitch on all seams that are suitable and to attach patch pockets will give your garment perfectly matched seams that are almost invisible too.

In the following tutorial, I aim to show you how to use Mattress Stitch on stocking/stockinette stitch and on garter stitch, but as you become more familiar with this technique, you will see that Mattress Stitch can be employed for a huge variety of seams. It really is the Shire Horse of the seaming world!


To begin, you will need a good length of the yarn that you knitted your garment with, a darning needle and some scissors. I have used a nice bright contrast - daisy yellow - so that you can see the mechanics of the stitching more easily. Any darning needle with an eye large enough to fit your yarn through is fine, and some scissors for trimming ends.

As you will see in the following series of pictures, the important thing to ensure a perfect seam is to be accurate. Making sure that the stitch on your right hand piece exactly matches the stitch on your left hand piece will mean that you won't end up with spare fabric on one side at the end of your seaming. I suggest taking time at the very beginning to avoid this, as mismatched stitches often don't become properly evident until you're nearing the end!

Beginning with a stocking stitch sample, place the 2 pieces to be seamed RIGHT SIDE facing in front of you - all mattress seaming is made with the right sides facing up. Next, starting on the right-hand piece, as in figure 1, pick up the bar 1 stitch in from the edge. If you insert your needle from bottom to top through the stitch to the back, you will be able to see the 'bar' between the v-shaped 'arrow' (figure 2)

Figure 1
Figure 2

At this point, it is important to ensure that you select the correct bar on the left hand piece. As you can clearly see in Figure 2, the right hand leg of the stitch which the needle is through, is leaning to the right. The corresponding stitch on the left hand side piece should be a left hand leg leaning to the left. In Figure 3 you can see these 2 sides with the 'ladder' of threads connecting the 2 halves - which, incidentally, is where Mattress Stitch derives its other name - Ladder Stitch from.
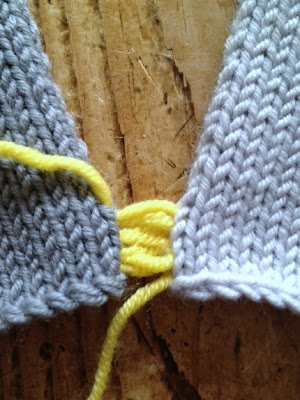
Figure 3

The next step is where the magic of Mattress Stitch really happens! Holding the bottom thread securely, pull firmly on the top thread (with the needle still attached) and watch the 2 pieces of fabric 'zip' together and the ladder disappear. As you can see in figure 4, the daisy yellow yarn now doesn't show, and the seam is almost invisible. You will also be able to see why it's so important to make sure you carefully select which 'bar' to pick up, as the neat join is comprised of the right and left legs of a 'v' - the normal shape of a 'knit stitch'.

Figure 4

Continue in this way, picking up an inch of stitches either side and then pulling them together. I find that if you pick up too many stitches and make the ladder too long, your thread can become tangled and not 'zip up' quite perfectly. See figures 5 and 6 which show progress up the seam and figures 7 and 8 illustrating the completed seam and wrong side view.

Figure 5                                                                              Figure 6

Figure 7                                                                          Figure 8

In the following section, the pictures show the same process but with garter stitch. The principle is the same, seam with right sides facing and match your stitches exactly on the left and right pieces to ensure a perfect join. The difference is that instead of picking up the 'bar' from underneath, you can see the bars or purl bumps on the surface of the fabric. This actually makes picking up the bars very much easier, but with garter stitch it is important to select a 'u-shaped' bump from one side and an 'n-shaped' bump from the other to give a seamless result (figure 9).

Figure 9

The yarn that you use to seam a garter stitch piece will need to be the same as the garment was knitted in, as it doesn't disappear so effectively as with stocking stitch (figures 10 and 11). You can see in figure 11 that the section at the bottom has a virtually undetectable seam, where the daisy yellow thread is evident in the top section.

Figure 10                                                                       Figure 11

Finally, in figures 12 and 13 you can see the finished seam and the wrong side.

Figure 12                                                                        Figure 13

The gaps at the top and bottom of the seam are easily joined with a few small secure stitches on the wrong side as you sew in the ends, and the result is a strong, almost invisible seam. Mattress Stitch is amazingly versatile and can be used to attach pockets or patches, as well as joining blanket squares or edgings. The only seam that I haven't yet been able to use it for, is for setting in sleeves, and for this I resort to back stitch. But who knows - perhaps I'll even give that a try with my trusty Mattress Stitch one of these days!
(posted by Max)

Tuesday, 20 August 2013

FIBRE EAST - report

Those of you who attended Fibre East last year will remember only too clearly the horror of worm armageddon and the unrelenting rain. I know that the mud seeped at least a foot up the legs of my jeans and there was a distinctly damp woolly smell in the car all the way home. We bemoaned the weather but praised those stalwart stallholders who stood in their own muddy puddles for hours on end, and as we poured over our purchases, each skein a little on the damp side - we all agreed what a thoroughly great day out we'd had!

What a difference a year makes! The sun came out, there was a change of venue (Redborne Community College in Bedford) and to my great joy, there wasn't a water-logged, worm infested field anywhere to be found. Instead - and grant me a little lenience here to indulge in a Great British pasttime - complaining about the weather - the sun beat down upon sheep, stalls and shoppers alike, making us all pant a little in the unbearable heat. The marquees were like open ovens, and the main halls inside the college building were stuffy and airless . . . at one point I would have given over my entire stash for air con and a drink of something iced. We all groaned about the heat and felt slightly worried that the overwhelming aroma this year was less damp and woolly, and more hot and sweaty! BUT, as we all sat steaming in the car on the way home, we all agreed that we'd had an immensely enjoyable time - which just goes to show that in England, we moan a lot about the weather but we NEVER let it spoil a good day out!

The queue snaked up the hill, but my knitting group had managed to get right to the front!

Sue Stratford
The wealth of gorgeous yarn, delectable fibre, accessories and handmade goodies was evident on every stall - and the Show was much bigger this year, attracting vendors from as far afield as Devon (John Arbon Textiles/ Fibre Harvest) and Felt4You from Holland. I particularly enjoyed meeting Emily Wessel - Tin Can Knits and bought her book - which she happily signed. Rachel Coopey was also there promoting her new book of socks and many amazing indie dyers such as Skein Queen whose yarn tree hung with 'mini squeens' was just stunnning, Sparkleduck, The Knitting Goddess and Boo's Attic and I must also give a mention to two MillaMia stockists - The Knitting Hut and The Knitting Gift Shop. It was great too, to see Texere Yarns there, in a room in the College, with their incredible bargain cones of linen and yarn, and the p/hop stand who do the most excellent fund raising for Medicins Sans Frontieres through donations for patterns. I missed Artisan Yarns who had been on my 'must see' list but found out later that they weren't actually there due to illness.

The lovely folk from The Knitting Gift Shop and Jo from the Shinybees podcast helping out Kate on the p/hop stand 

After the initial round of shopping, we were all ready to retreat to a shady corner of the field and meet up with some knitting friends whom we had arranged to picnic with. We ate and shared our purchases and then, of course, the knitting and crochet projects emerged from each bag until we were all sat happily chatting and crafting in the sun. It was a lovely calm and relatively cool hiatus in a busy day and gave us all a chance to gather ourselves for one last foray amongst the stalls to buy up those precious items that we couldn't leave behind.

Honestly, our last meander through the stalls was rather half-hearted as we were more than a little distracted at the thought of finding some ice-cream, but we made a few final purchases (mine was some very pretty fibre from HilltopCloud which my splendid friend Helen is going to spin into scrumptious yarn for me!) and then made our way across the field back to the VERY hot cars.

Beautiful fibre
I really do love a day out at a fibre and knitting festival, and there are an increasing amount to chose from. Some of the bigger more well-established events are great for seeing the big brands that we all know and love, but these smaller shows are often the place where you can find the unusual, meet with the fabulous local yarn shop owners and designers and get to know new knitting friends. Fibre East has grown this year, but still manages to feel intimate. Come rain or shine, it'll be on my list of fabulous fibre festivals to visit next year.
(posted by Max and with special thanks to Kirsty Collins for the use of some of her photos)

Sunday, 11 August 2013

A smile for a thank you

I think I have blogged once already about how amazing it has been receiving these fantastic knitted gifts for Johan - and I am conscious that there are many that I have yet to say thank you for. Therefore when I saw this fun photo of him modelling the Kalle Tank Top from Little Rascals that Max knitted for him earlier this year - I thought his smile said it all!
Johan in Kalle Tank Top

You can really tell he is having a fun day - and dare I say it he even looks like he has a little mischievous glint in his eye - a little rascal in the making. Thanks Max for making this in such a sweet colour combination (Seaside and Putty) that has been perfect for spring and summer (this photo was taken last week as we are currently enjoying a bit of time in Sweden.) If you want to learn more about the technical side of this pattern do read Max's previous blog post on this project.

Posted by Katarina

Friday, 2 August 2013

EMILIA - FREE PATTERN!

You would be forgiven for thinking that Christmas has come early as we have another stunning pattern to give to you for FREE! We know that the weather here in the UK has been so splendidly sunny that even the most hardcore knitters amongst us have been forced to put down our needles, but there is nothing quite like being prepared for the inevitable cool down. So, if you are looking for a project to while away the evenings, and know a gorgeous little girl who would love this pretty dress that's perfect for the transition from summer into the cooler days ahead, then look no further than our lovely FREE Emilia Dress pattern.


The Emilia Dress is a super stylish short-sleeved pattern with beautiful Scandinavian influenced fairisle detailing around the waist, and chic contrasting sleeves and rib. The colour combinations are pretty whilst still being fun and with the smallest size taking just 4 balls of yarn in the main colour (petal) and 1 ball each of storm, grass, fuchsia and snow, it's right on trend for a move from summer to autumn. 


As always, we show the Emilia in an alternative colourway - using forget-me-not as the main colour with the contrasting rib in midnight, and fuchsia, daisy and snow making up the other shades. If you're feeling adventurous and want to create a colourway of your own, but need a little help, why not try out the colour tool available on every pattern page? This delightful dress pattern ranges from age 2-3 years in the smallest size up to age 6-7 years and is simply constructed from a front, back and 2 sleeves so earning a beginner/improving rating.

The Emilia Dress pattern is available for download from our website www.millamia.com now. We'd love to see your gorgeous girls in their own Emilia's so do please post your pics on our Ravelry group page or send them to info@millamia.com - we are always delighted to see your finished garments!

(posted by Max)